Carry Awards
 Insights
 Liking
 Projects
 Interviews
Carryology delivered. Your inbox. every two weeks.
Only the best stuff (and giveaways!), we promise.


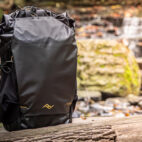
First Look: Osprey Arcane Rolltop Waterproof 25L Backpack
Osprey are one of the biggest names in the Carry game. Their packs are ubiquitous with adventurous hikes and sprawling vistas. More recently, they’ve turned their attention to two things: EDC and circularity in their material choices.
Gear reporter DaveSam checks out one of their newest offerings, the Osprey Arcane Rolltop Waterproof 25L Backpack. This waterproof backpack can handle whatever weather system you find yourself in. From blizzards to driving rain, the IPX4 rated Arcane Backpack will keep all your contents dry.
Thank you to Osprey for being a #curatedsponsor for this video.